The squat is a cornerstone of athletic training and rehabilitation. Whether you're aiming to build strength, improve mobility, or recover from injury, how you perform this essential movement matters. Today, thanks to artificial intelligence, we can go beyond visual guesswork and analyze squat mechanics with precision—as long as the video input is captured correctly.
In this article, we'll walk through how to properly record squat videos for biomechanical analysis using the AiKYNETIX Web Platform or iOS App. This process is not just about camera angles—it's about creating conditions where advanced computer vision can deliver meaningful, data-driven insights into your movement. These insights help identify dysfunctions, refine technique, and reduce injury risk.
In this article, we'll walk through how to properly record squat videos for biomechanical analysis using the AiKYNETIX Web Platform or iOS App. This process is not just about camera angles—it's about creating conditions where advanced computer vision can deliver meaningful, data-driven insights into your movement. These insights help identify dysfunctions, refine technique, and reduce injury risk.
Why Analyze Squats with AI?
From a biomechanics and sports science perspective, squats involve coordinated movements across the ankles, knees, hips, pelvis, spine, and shoulders. Subtle misalignments or compensations can lead to reduced performance or injury over time. Unfortunately, these nuances are often hard to spot without motion analysis tools.
This is where AI-based analysis like AiKYNETIX excels. By analyzing video data, it calculates joint angles, movement symmetry, range of motion, and deviations in real time. It then translates this into a clear report with mobility scores, technique quality, and actionable recommendations.
This is where AI-based analysis like AiKYNETIX excels. By analyzing video data, it calculates joint angles, movement symmetry, range of motion, and deviations in real time. It then translates this into a clear report with mobility scores, technique quality, and actionable recommendations.
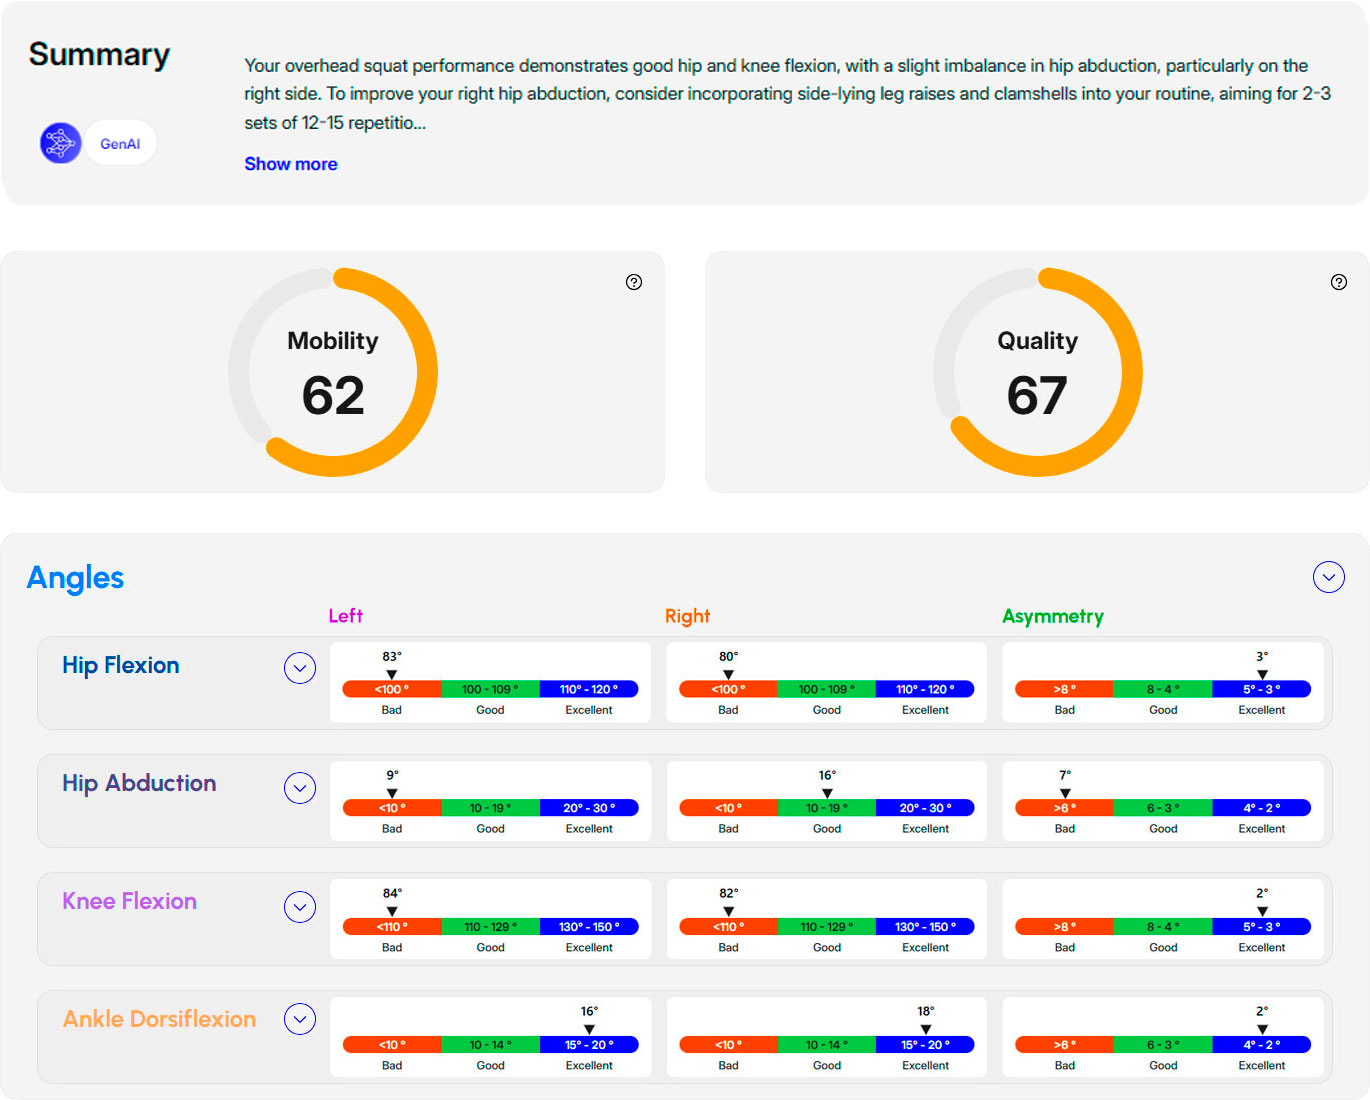
Pic 1. AI-Powered Squat Breakdown
Step 1: Set Up the Recording Environment
Proper setup is essential for accurate motion tracking. AI systems rely on consistent lighting, contrast, and full-body visibility.
✔ Choose the Right Space
✔ Optimize Lighting
✔ Wear the Right Gear
✔ Choose the Right Space
- Use a flat, non-reflective surface—avoid carpets or uneven terrain.
- Stand in an open area with no moving people or pets in the background.
- Avoid mirrors or windows that could create glare or duplicate your image.
✔ Optimize Lighting
- Use natural light or diffuse LED lighting from multiple angles.
- Eliminate harsh shadows on the body.
- Don’t film in front of windows or under direct ceiling spotlights.
✔ Wear the Right Gear
- Form-fitting clothing (e.g., compression shorts, leggings, tank tops) enhances AI accuracy.
- Use solid, contrasting colors to differentiate limbs from the background.
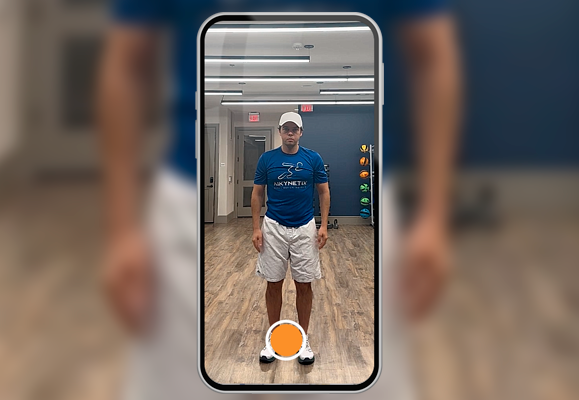
Pic. 2 Recommended Recording Environment
Step 2: Camera Setup for Optimal Biomechanical Capture
The quality and positioning of the camera determine the precision of the joint-angle data.
✔ Use a Stable Setup
✔ Record from Multiple Angles
✔ Use a Stable Setup
- Mount your smartphone or camera on a tripod at hip-to-waist level (~1 meter/3 feet).
- Handheld recording is allowed, but shaky footage can throw off tracking.
✔ Record from Multiple Angles
- Capture three views in a single video session:
- Front (facing the camera)
- Left side
- Right side
- Keep the entire body in frame—head to toes—at all times.
- Maintain 1080p resolution or higher at 30 frames per second for best results.
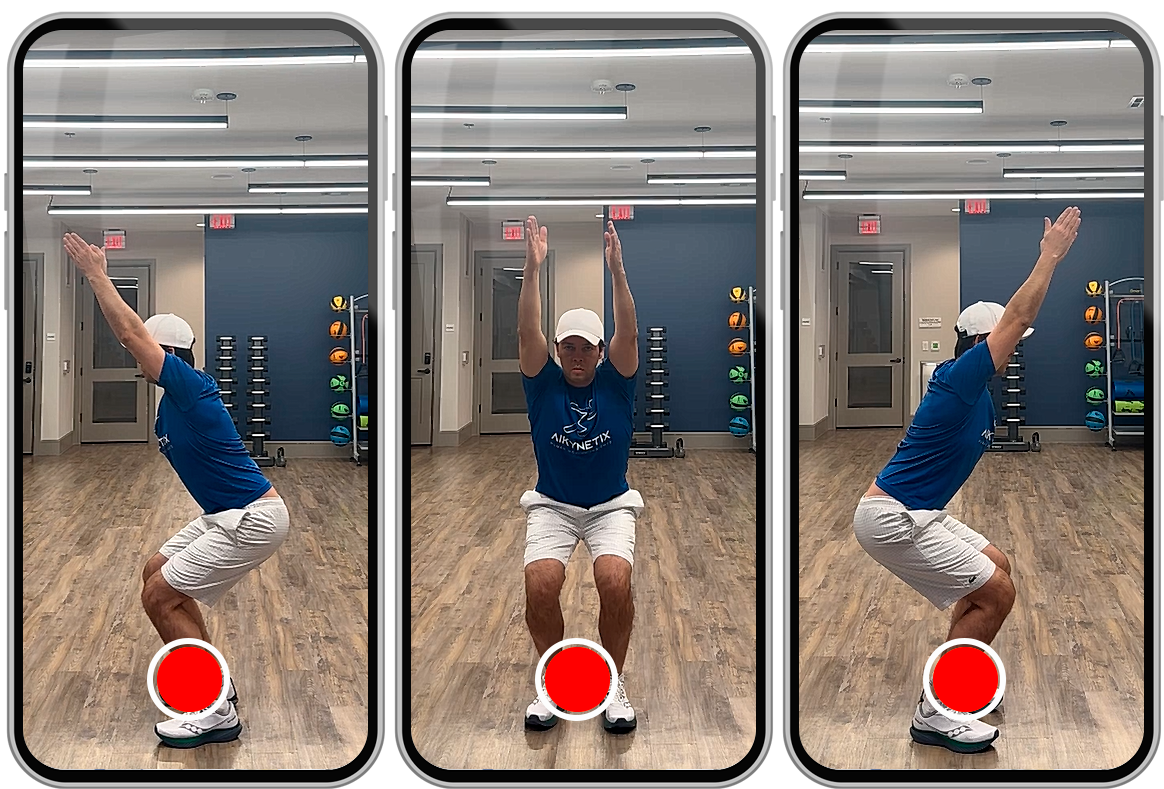
Pic. 3 Capturing three views in a single video session
Step 3: Perform a Controlled Overhead Squat
Once everything is set up, it’s time to move. The overhead squat is one of the most effective diagnostic movements available.
✔ Execution Checklist
This movement places demands on the shoulders, thoracic spine, hips, knees, and ankles simultaneously—making it a gold standard for functional movement screening.
✔ Execution Checklist
- Start standing tall with feet shoulder-width apart and arms raised overhead.
- Perform a slow, controlled squat, maintaining the upright arm position.
- Avoid bouncing or rushing the descent and ascent.
- Complete one full squat per camera angle, ideally in a single video session.
This movement places demands on the shoulders, thoracic spine, hips, knees, and ankles simultaneously—making it a gold standard for functional movement screening.
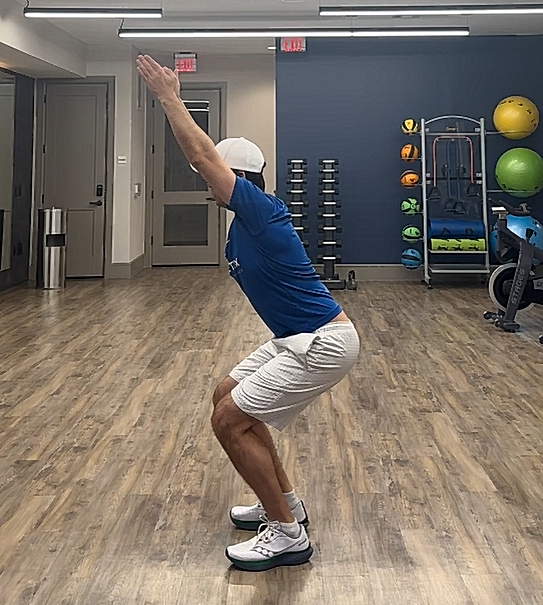
Pic. 4 Overhead Squat Position
Step 4: Upload to the AiKYNETIX Platform
Once recorded, upload your footage to AiKYNETIX:
1. Visit the AiKYNETIX Web Platform or open the iOS App.
2. Select “Mobility Assessment” as the activity type.
3. Follow the upload instructions and submit your video.
4. Within minutes, you’ll receive a Session Summary showing:
1. Visit the AiKYNETIX Web Platform or open the iOS App.
2. Select “Mobility Assessment” as the activity type.
3. Follow the upload instructions and submit your video.
4. Within minutes, you’ll receive a Session Summary showing:
- Mobility Score
- Technique Score
- Joint angles (hip, knee, ankle, spine, shoulders)
- Movement symmetry
- Recommendations based on your performance
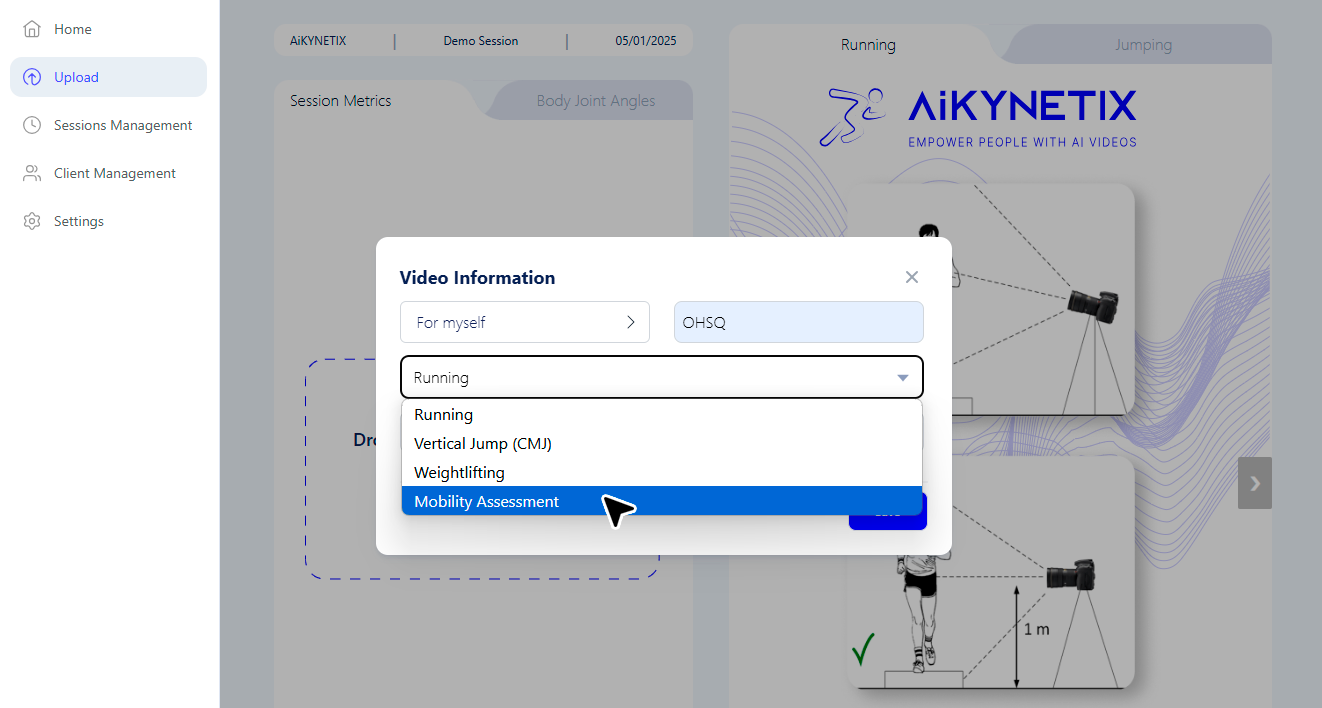
Pic. 5 Uploading to AiKYNETIX
Step 5: Interpret and Apply Your Results
The real power of AI analysis lies in actionable insights. Here's what users typically receive:
For athletes, this data can expose weak links, mobility restrictions, or compensatory patterns that limit performance. For physiotherapists, it provides objective baselines to guide and adjust rehabilitation programs.
- 🦵 Joint Flexion Angles (e.g., hip at 83°, knee at 84°)
- 📈 Asymmetry Reports (e.g., right hip abduction weaker than left)
- 🛠️ Recommendations (e.g., “Add side-lying clamshells 3x15 reps”)
- 🔁 Progress Tracking over time
For athletes, this data can expose weak links, mobility restrictions, or compensatory patterns that limit performance. For physiotherapists, it provides objective baselines to guide and adjust rehabilitation programs.
Benefits of AI-Based Squat Analysis
✅ Early Detection of imbalances and dysfunctions
✅ Evidence-Based Training Adjustments
✅ Objective Rehab Progress Monitoring
✅ Accessible Anywhere—no expensive lab or sensors required
✅ Motivating—users see real improvement over time
✅ Evidence-Based Training Adjustments
✅ Objective Rehab Progress Monitoring
✅ Accessible Anywhere—no expensive lab or sensors required
✅ Motivating—users see real improvement over time
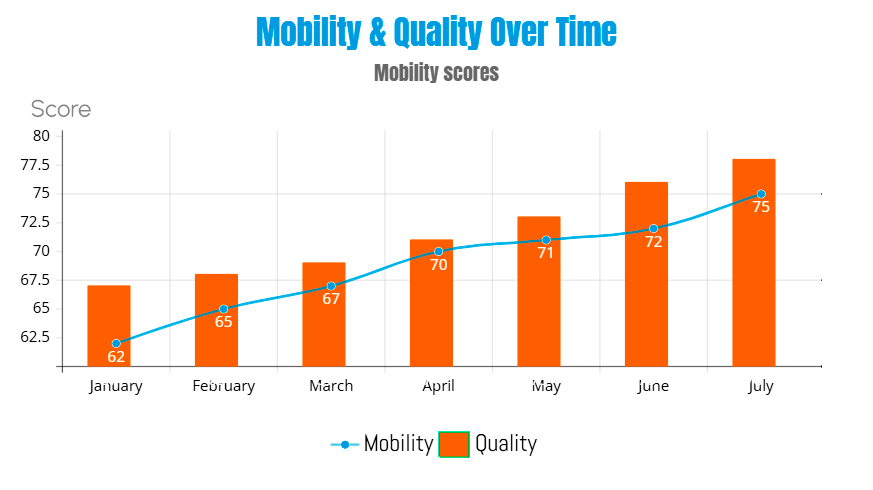
Pic. 6 Performance Progress Graph
Final Thoughts
Incorporating AI-powered video analysis into your training or rehab workflow isn’t just smart—it’s a game-changer. With the right video setup and a reliable tool like AiKYNETIX, you gain access to data that was once only available in elite biomechanics labs.
As professionals, our job is to help people move better. Recording and analyzing squats correctly is a vital step toward that goal—because better data leads to better decisions, better outcomes, and better health.
As professionals, our job is to help people move better. Recording and analyzing squats correctly is a vital step toward that goal—because better data leads to better decisions, better outcomes, and better health.
AiKYNETIX Web Platform - advanced features ideal for professionals.
Run, Jump, Lift - AiKYNETIX | Run AiK | Jump AiK | Lift AiK - convenient on-the-go analysis.
📖 Explore More:
1️⃣ Why the Squat Is Essential—and Why We Should Be Measuring It with Smart Tools
2️⃣ How to Record Running Videos for AI-Powered Analysis: A Step-by-Step Guide
3️⃣ Comprehensive Guide to Recording and Analyzing CMJs
4️⃣ How to Record Weightlifting Workouts Accurately with the AiKYNETIX App
Check them out for deeper insights!